Creating Favorite Icons with a Transparent Background Using Photoshop
December 17th, 2007
If you haven’t noticed or cleared your Internet cache in a while, I have been working on some new logo concepts for the site. Anyway, after doing so I had to change the favorite icon too. I set out on my journey to find the perfect tutorial for creating favorite icons with transparent backgrounds. I tried a few different tricks and none of them worked flawless like I wanted.
So I kept doing some research and testing until I found a method that was easy enough to explain to anyone. Most of this tutorial is based on Windows XP and Adobe Photoshop CS2 illustrations, but you can use the menu through most of it if your on a Mac.
The ICO File Format Plugin for Photoshop
This is the secret behind the whole bit. So lets get started here.
Download Icon File Format Plugin for Windows or Mac
Once downloaded, Add ICOFormat.8bi to your Photoshop File Formats directory.
[html]C:\Program Files\Adobe\Adobe Photoshop CS2\Plug-Ins\File Formats[/html]
Be sure to restart Photoshop so the plugin can load
The Image
Restart Photoshop and create a new 125×125 transparent RGB image.
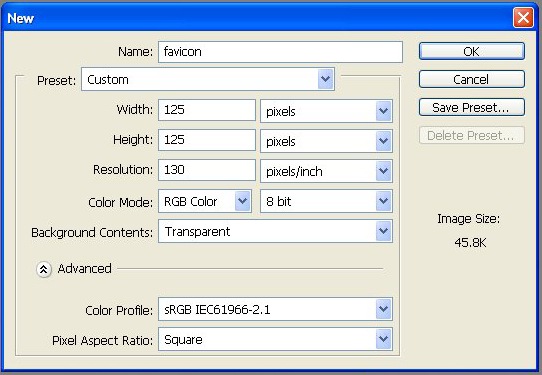
Now create your image and leave the background transparent. Try to use as much of the blank canvas as you can.

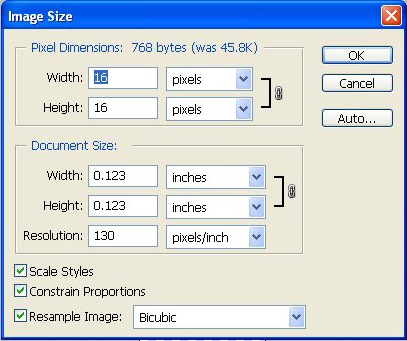
Once you get finished with the design save your file as favicon.psd and then it is time to resize it to 16×16. Just go to Image ? Image Size in your Photoshop menu.
Saving the Icon
Saving your new icon is rather straight forward. Just go to File ? Save As and pick the .ICO format from the file type drop down list.

What if I don’t have an option for the .ICO format?
This means your image mode is not set to RGB, wrongly installed the plugin, or forgot to restart Photoshop so it could load.
To correct the RGB problem simply go to Image ? Mode in your top menu.
Posted in How To •